
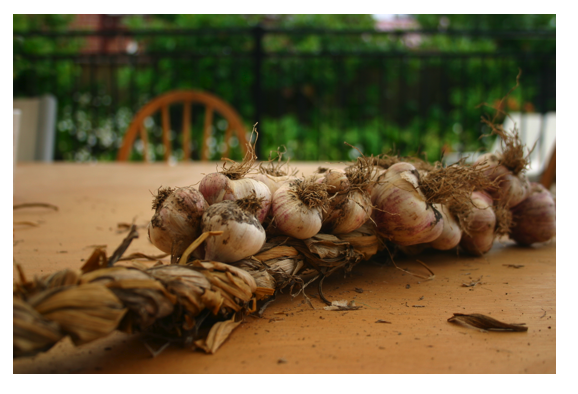
The plaiting is finished and the aroma of fresh garlic fills my kitchen. I’ve had a nice crop of garlic this year and it always brings a sense of satisfaction to harvest my annual supply of organic garlic bulbs for cooking. Garlic is one of the easiest things to grow in the home garden but people seem to overlook it when planting out the veggie patch.
It does take a while – 6 months to be precise – to grow. So you do need to have a section of the garden tied up for this amount of time. But it’s during the cooler months, often when there’s not a lot of other things growing in the garden, that you grow it.
 This year I went against tradition and saw some great results. Some traditionalists will tell you to plant your garlic cloves on the winter solstice (the shortest day of the year) and then harvest them on the summer solstice (the longest day of the year).
This is how I’ve usually grown my garlic previously, but this time I took the advice of another gardener and planted my garlic close to the autumn equinox, when daylight hours equal night time hours. This occurs around 20/21st March for us in Australia. It means that you can start harvesting earlier in spring, rather than waiting until summer time. In cold regions it’s often best to delay planting due to freezing temperatures.
We’ve had some fairly mild temperatures this season and lots of rain, so conditions have been favourable and I added a good helping of compost before planting. The garlic grew solidly and steadily during winter. I experimented with half a row planted on the traditional winter solstice for comparison. Those planted later haven’t performed nearly as well as my earlier ones.
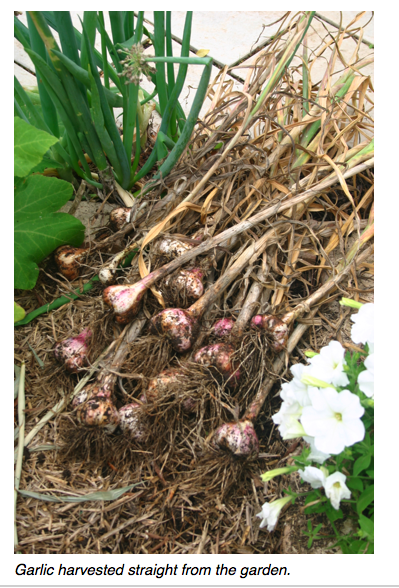
The mature garlic was left in the ground until much later than I planned because I’d been busy, but the plants still looked quite healthy. Once the tops of my garlic started to die down that was the sign to harvest.
I’m often asked how do you know when to harvest garlic and sometimes it can be a bit tricky to tell. Sometimes garlic will flower and sometimes it won’t. So flowering is not always a reliable sign that’s it’s ready. Sometimes if you have particularly wet weather then bulbs will start to rot in the ground before maturity and the tops will die off. So even the tops dying down is not a reliable sign. It’s a matter of knowing your soil, your conditions and your garlic. Given that your garden has good drainage and won’t rot the bulbs then dying back of the leaves is the best indicator. Just have a little dig around the bulb without removing it to check that all is good and the bulb has developed to full size.
Leave the plants to harden off for about a week by not giving them any water. This dries them out and helps with future storage. Lifting wet soggy bulbs can cause all sorts of problems with rotting later on.
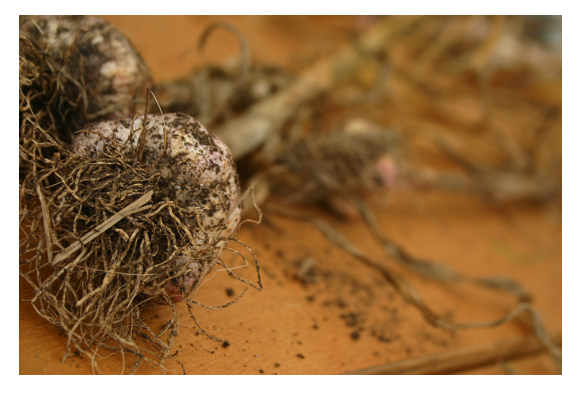
Lift the bulbs from the ground by loosening the soil with a pitch fork, making sure you don’t get too close to the bulbs and stab them. Gently lift the soil so that the garlic bulbs can be pulled and removed. Then just shake off any loose soil from the plants. Leave some soil on at this point, it’ll get removed later. Don’t wash the bulbs now because you’ll increase risk of rotting.
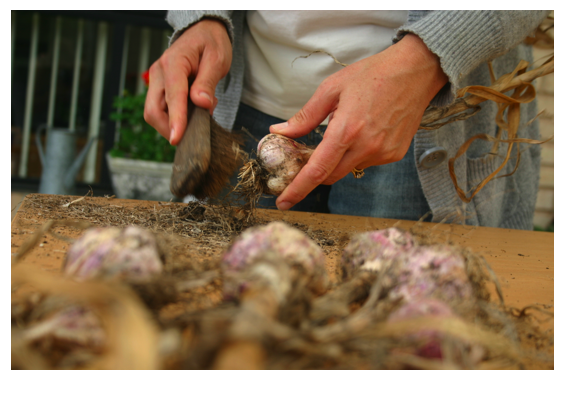
The next step is to leave your garlic to dry for about a week in an airy open spot, under cover. I left mine on a rack under the pergola. You’ll notice that the bulbs become quite hard in this time. This is an important step to make sure that they store for longer. Once the bulbs have hardened, you can remove any excess soil with a brush. This comes off much easier now than doing it straight after lifting them from the soil, when you could risk damaging the soft bulbs.

Once the bulbs have been hardened and cleaned you can simply plait the leaves together like a French braid.
Start with 3 bulbs and plait in the normal way.
Working from the outside, gather up another garlic bulb with each fold that you make along the edge.
Keep gathering more bulbs until you’ve plaited them all in and you’ve made a long braid.
Tie the end and hang it up in the kitchen so it’s always within reach for cooking.
Enjoy!
Photography by Maddie.


 Twitter
 Facebook
Great article. Thanks for sharing this information with us.
I live in Canberra so winter is very cold overnight, with many frosts. Would you still recommend I plant the bulbs into the ground soner rather than later? Or should I wait for the more traditional Winter Solstice? I’d be interested to hear your thoughts as I’ve not grown garlic before but am keen to.
Cheers Nina
Living in Canberra, I’d probably wait until the traditional winter solstice. But why don’t you experiment? Try a few now and then more in June. Good luck.
Thanks for this information re garlic harvesting and planting. I planted garlic in two different places in the garden here in Canberra in mid March this year and have noticed that all plants are starting to dry on the outer leaves. After reading your article I’ll now stop watering them and harvest in the next week or so which will be early November.
Planted my first crop of garlic last year in pots, fed them with DynAmic lifter and bulb booster. Leaves have well and truly withered so I probably should harvest them but not really been motivated. Had a peek at one bulb a couple of weeks ago and the bulk was only about the size of two cloves!! Very disappointed, where did I go wrong?:-(
Just dug up my assorted garlic last week and it is currently drying out. Thanks for your very helpful info on drying, plaiting etc as I have never attempted to plait, just lazily tie in bundles of 12 and loop them on hook in hubby’s shed! Every year I increase my garlic planting as once you’ve tasted homegrown garlic, there is nothing to compare. Looks as if I’ll have enough garlic for the whole street…..
Like you I never plant according to what the books say! I love to experiment and I always get a great crop and just love having garlic growing as they are so easy to care for.
Hopefully garlic should be ready to plait by weekend.
Dynamic lifter is pelletised chicken manure and very high in nitrogen. This encourages leaf growth instead of bulb development. I would use blood and bone or rock dust and compost instead of DL.
Awesome work, Dirtgirl!
Thanks for reporting this on Facebook! I was planning to plant garlic around now. Just one question: do you just buy ordinary supermarket garlic and put it in the ground? Do you wait for it to sprout first? How far apart and how deep should it be planted? Many thanks!
Jacqui it’s quite easy. Just get a bulb from a reputable green grocer (so you know that it hasn’t been sprayed with anything – sometimes growers will spray garlic with a hormone to stop it shooting so that it keeps better in the pantry but not so good if you want to plant it). Otherwise get some from a mail order catalogue, e.g Diggers, Greenharvest, Greenpatch seeds etc. You don’t need it to sprout before planting. Just peel off the individual cloves and plant them to a depth of two or three times their size (don’t forget pointy end up). Plant each clove about 10 – 15 cm apart depending on the variety (smaller ones can go closer together).
i paklnted garlic for the first time last year but wasn’t very successful. think they got too much water as were planted in with other things. How often do you suggest watering? I live in Far west NSW with very few frosts and only light if at all.
Pam, garlic will need a regular consistent water supply especially early in the season. Well drained soil is essential so that the bulbs don’t rot, so don’t let them get waterlogged. Frequency of watering differs from soil to soil depending on how well you have improved your soil. Some soils hold water well while other sandy soil will need more work done to it. Hard for me to say exactly how often to water your garlic except to say that you could stick your finger into the soil and feel if it is dry or too wet. Get a better idea doing that. Good luck.
My garlic should be almost ready to pull (it is October here in the west). They have developed well, but each individual clove has sprouted and all have long healthy stems as well.. We have had a very mild and wet spring so wonder if they are confused as to which season it is! Would love some advice as to what has gone wrong with them this year. I followed the usual advice as it time of planting and fertilising etc and they were coming along nicely. I am thinking that I will need to leave them to finish growing and maybe I will then harvest a massive crop who knows when?!?
Unfortunately, some years are better than others.
Compost seems to work well for developing bigger bulbs, so incorporate it at planting or side dress as they grow.
Hi,’ I live near Tumut NSW where we get quite a bit of frost and freezing weather over the winter. I grow the large Russian Garlic and have never had a problem. I harvest the huge main bulbs and leave the corms, which have developed around the blub, in the ground. These stay in the ground all year and grow into another big crop for the next year.
Hello fellow green thumbs!
We live in outer burbs of Melb and planted garlic about 3 months ago (Sept.) not knowing when, why or how …in other words being a complete novice! The leaves are greening up and are about 7-8 inches tall. Just wondering when would be the best time to harvest? Your help for our family of little ‘dirt kids’ would be greatly appreciated! Cheers, Dirt Man
G’day Dirt Man!
Best time to sow garlic is either Autumn through to Mid Winter, so September might have been a little late.
Never mind, that’s just something to note for next year.
In the meantime, see how this crop goes. It usually takes about 6 months to mature, so your stalks might die off before you have a chance to develop a good sized bulb. Harvest when the tops start to die off.
Hi,
I usually follow the solstice planting and have had good results. Last year I planted all the little bulblets I had harvested, not really knowing what to expect. I have just had spindly little shoots and no real bulb development. Should I just leave them in the ground to keep growing?
I’m excited to try planting in March, I’m in northern NSW and it’s always quite mild. Thanks for the tips!
Di
Yep I’d leave these little ones in to do their stuff now.
Let us know in 6 months how it’s all worked out for you.
I have an asparagus crop of 8 plants , planted around 40cm apart and extremely well mulched. When I thought about what I could do with this precious soil in between whilst the asparagus was dormant duriing winter, I hit on the idea of planting garlic. The local grocery store fortunately had Australian white garlic for sale. I promptly bought enough to break off 55 cloves and planted them two weeks ago. The garlic plants are now peeking their green shoots through the mulch cum blood and bone mix. My intention is to add more mulch once the plants are large enough to keep their heads above the 3 inch layer of mulch I intend to add in the coming weeks. In the meantime the asparagus will do its stuff in Spring and will be harvested continuously until Christmas, leaving the soil exposed to the sun for the garlic to mature at the same time in the space in between.
Adrian
That’s an awesome idea Adrian.
I might have to do likewise!
Hi
I have enjoyed perusing your website and found all wonderful feedback great to read.
We too are growing garlic, gut for us we are in our 1st year and growing Elephant or Russian Garlic. The garlic at this stage has unopened flower spikes 1 to 3 feet long and we were wondering whether to snap or cut these off to help the plant focus on bulb growth or leave them. We have noticed both options in our ‘online’ research and just thought to ask what you might recommend for this particular variety.
Any ideas you might suggest are appreciated muchly.
Mike & Kate Ward
Hello,
Thank you for a great article.
Like you, this year I followed some advise from a friend and planted in the autumn solstice. The leaves are now browning off and I think ready to lift. This is the third year I have planted from the previous years crop as well as enjoying our own garlic for 10mths.
We live in SW Victoria so weather unpredictable and like to rain at the drop of a hat.
I look forward to looking at the rest of your web site as i came across this article by chance.
Cheers
Karen
Well done. It’s great being able to harvest almost a year’s supply from your own garden.
Enjoy your next harvest.
Hi
We planted garlic from Diggers in fall & we keep checking but no bulbs only single stem like a leek. We live in Vic. What did we do wrong not to get cloves? We have left them in hoping to get some
Hoping you can help
Deb
Hhhmm, that’s a mystery.
Perhaps if you have had a lot of rain the bulbs may have rotted?
Hi Veggie Lady,
I have grown 12 garlic plants. Planted in April and harvested November. I have since noticed that the seed heads are growing with a lot of small clove-like projections. (Garlic cloves, that is) Since these may be growing at the expense of the cloves in the bulb, should I cut them off? The plants are currently hanging in my garage to ‘dry out’.
Yes I would do that. You don’t want a waste of energy now.
Thanks Toni!
I just harvested my 1st crop of garlic today but I cut off the stems not realising I could plat & hang them I left roots & soil and put in a metal colliander on paper towel in garage to dry .
What are your suggestions for drying them since cut stems, and when can I replant one of the bulbs.
My Italian mother in law gave me the bulbs, she plants all yr round and watches what the moon is doing for all her food planting
Dry them exactly the same as if you had the stems on. Just make sure there’s plenty of air circulating around them for a couple of weeks or so.
Plant the cloves in Autumn around March or April.
Thanks Toni I have left about a 10cm stem on the garlic so I have used twine to tie them up & are hanging up in my garage to dry, next time I will plant a lot more I only did 10 cloves as a test so I got 10 bulbs of garlic, should I plant in same spot or do a little rotation only smallish area I have (raised bed)
Always best to rotate crops if you can.
Don’t the home grown bulbs smell great! Enjoy you “first fruits”.
Hi, Just an idea if you have limited space – I planted my elephant garlic in my rose garden. I had no aphids on these roses compared to the front roses, which had lots on them, and had a really good crop of garlic, which I am just harvesting, so plan to do the same next year. The tip about using blood and bone as opposed to dynamic lifter is good, as I do tend to throw it around a bit!
Great tip, thanks.
Very interesting re the curing, I have been trying to preserve crushed in oil with little success, have you any tips ?
Should I dry it first before bottling it with oil Z.
I’m not sure about this.
Anyone else got any ideas?
I’m in a different situation to what everyone else has done. I have dropped a couple of cloves in an aquaponics setup, not knowing anything about garlic, I actually planted it late December 2014. It seems to have grown, but I’m unsure as to whether I wait for the stems to grow or whether I wait for it to get to a certain size, because I didnt realise the best time was to plant in winter.
Any advice, how do I tell? Or does it just segment itself?
Cheers
Normally the clove will grow onto a whole new bulb with several cloves from the one original clove after about 6 months. But since you’ve planted it i nsummer then there are no guarantees. You may find that you have to leave it in the growing media for longer so that it gets the appropriate chilling through winter to develop the bulb. Aquaponics systems are often very high in nitrogen and stimulate leaf growth at the expense of bulbs.
Thankyou, I will keep my fingers crossed that something positive happens.
Wow; great info, very practical and the detail is excellent. As a newcomer to garlic planting, I planted garlic for the first time and without any knowledge on the subject in April 2015 and just hoped for the best. I live in Adelaide and thankfully, the garlic has grown vigorously, with the tops just starting to die back now (August 18th).
Your article has now been saved in my “favourites” list – I found it very helpful and easy to understand, so thank you so very much.
Thanks for that feedback Peter. Glad to be of service!
I love this article. I just noticed that my garlic crop had flower spikes and wasn’t sure if I should harvest so as not to lose the bulb. I planted early so decided to harvest. I didn’t have much room so planted some in a pot and some in the ground. The ones from the ground are much larger and look better. The ones from the pot are smaller. Can I use the ones from the pot for my next crop or could they be too immature?
Always use the biggest and best bulbs for the next season’s planting.
I am in Canberra and have just harvested my first crop of garlic. They are fantastic! Your article has me on the right track for drying out and storage. Thanks so much.
Well done! Happy plaiting.
I planted out garlic for the first time in late April, and today I lifted 64 bulbs of various sizes. I had no idea when to harvest, until I found your article. What I had planted was, Rose du Var, Oriental Purple and Red Toch
Thankyou for your very iinformative article.
That’s fantastic! Enjoy your home grown delights.
I have grown some garlic from a plant I bought, but plan to put in some cloves tomorrow. Just thought I would mention for those asking about preserving the garlic – I don’t like imported garlic, so buy a lot of Australian garlic when I can find it and then break it into cloves and pop it in the freezer. Works really well and there is no loss of taste that I can determine.
Very excited as my ginger that I planted in a pot has 2 sprouts – this is my first time that I have had even a bit of green showing, so fingers crossed. I am in Melbourne.