

Finding organic garlic can be difficult and expensive.
But it doesn’t have to be.
You can grow your own garlic easily with a bit of time and patience.
Here’s how.
Why grow garlic?
Imported garlic bulbs (you know the ones, they’re bright white and sold for $2 kg) are best avoided. Countries like China don’t have the agricultural regulations like we do. In fact, our banned and deregistered pesticides are often disposed of by selling them off to these countries. While we can’t sell anything grown with these pesticides, we can however, import produce from another country that has used these pesticides on their produce.
Crazy, isn’t it. But it gets worse.
Those bright white bulbs are that colour because they’ve been bleached to disguise the naturally occurring dark spots on the bulbs.
Now, have I convinced you to grow your own garlic yet?
Steps to grow garlic
1. When to start
First check that it’s the right time of year to plant garlic for your area. Cold climates generally plant in winter around the shortest day of the year. Temperate climates plant a little earlier, after the autumn equinox. April is a great time for this in Australia.
Want to check when the best time is to plant garlic and other veggies in your area?
Download your FREE planting guides here.
2. Choose your garlic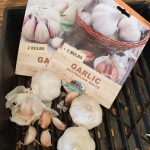

Next find yourself a quality organic garlic bulb. You can source these from a nursery, online catalogue or organic grocer. Hard neck varieties and soft neck varieties are available but check which is best for your area before you jump in.
3. Prepare your soil
Prepare your soil with generous amounts of compost, but don’t add manure. Manure will cause too much leaf growth at the expense of bulb set. If you have drainage issues then choose raised garden beds. Garlic hates to be kept too wet and will rot. Learn how to prepare veggie garden beds in my online course.
4. Plant the cloves
Break up the cloves and plant them about 5cm deep in the soil. Plant cloves around 10cm apart. Cover them with soil and keep moist.
5. Mulch your plants
Mulching soil in dry summer conditions helps to conserve moisture and keep weeds out. They don’t like competition from surrounding weeds.
6. Keep moist
Water your plants regularly throughout the growing season. A deep watering once or twice a week is usually better than a light sprinkle every day. Moisture penetrates deeper this way and reaches the root zone of your plants.
7. Strengthen your plants
Use a seaweed solution to stimulate your plants and keep them healthy. Seaweed is not a fertiliser but instead, works to strengthen your plant by stimulating growth and cellular activity within the plant. A strong plant will have natural resistance to pest and disease. A dose of seaweed solution every couple of weeks will ensure success and produce bigger bulbs.
Be patient
Your biggest enemy when you grow your own garlic is time. Garlic takes time to grow. In fact it takes at least 6 months. Yes, that’s right. It’s a long time to tend to your plants before you see the results. So you need to be patient and persistent. You will see a lot of leaf growth to start with and no bulbs. Bulbs develop later, after the leaves get big enough to supply the energy to set bulbs below ground.
Be persistent
Tending to your garlic plants takes persistence because of the length of time it takes to grow. Expect to see most leaf growth in the early stages but then nothing in the later stages. This is because all the work is being done underground. Don’t be fooled into thinking that they’re not growing, they are. You just can’t see the growth above the soil.
Be patient and wait for the bulbs to develop in time. Be persistent by watering and feeding your plants for the whole 6+ months.
How to tell when your garlic is ready to harvest
It’s often a bit tricky to know when to harvest your home grown garlic because it’s hidden underground. Remember it takes time. A lot of time. Some garlic varieties will put on a flower scape while others won’t. The “scape” is the long, stick-like stem with a flower head on it shaped like a pom-pom. Once the flower scape dies off then it’s time to think about harvesting.
But if your garlic doesn’t produce a flower then check the leaves. Once your leaves start dying down then it’s also another sign that your garlic may be ready. Check how big the bulb is by digging down and pushing aside the soil around the bulb without pulling it out. Feel how big it is and then harvest it if it’s a good size.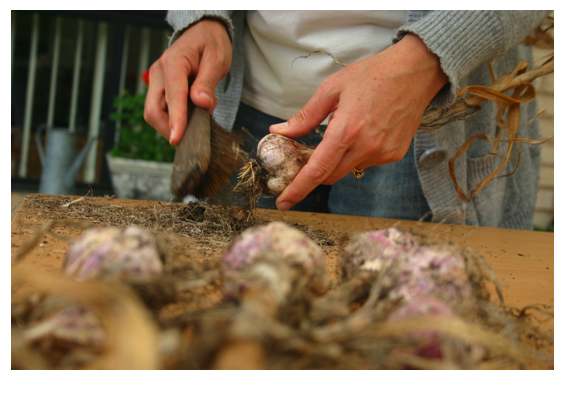
Once you harvest your garlic bulbs they’ll need to be dried before storing them.
See how to effectively dry out (or cure) bulbs and plait your home grown garlic for storage here.
Organic Gardening
When you grow your own garlic, you are in charge of what pesticides you use. You can have the confidence of knowing that your garlic is totally organic, free from toxic chemicals that can harm you and your family. Eating organic produce is a great way to stay healthy and a healthy diet can also enhance your mental health. Organic gardening is a super relaxing alternative to too much screen time. Watering and feeding your plants is a good excuse to get outside and enjoy some fresh air, mindfulness and relaxation. Not only do you improve your health, you also get great produce to eat and cook with.
More ideas and help
Every dish tastes better with a bit of garlic, don’t you think? If you’re super keen to add that “little bit extra” flavour to your favourite dish, then try making Black Garlic with some of your home grown garlic.
Every month I help guide veggie gardeners through each growing season to get a better harvest and avoid common problems. Join my VIP Club Membership for all the helpful hints and tips that I’ve learnt over 30 years of gardening.


 Twitter
 Facebook